


25. Kennards Hire Rally Australia 2016
WRC #14 • WRC2 #14 • WRC3 #14 • Australia #8 • Australia 2WD #8 • New South Wales #6 • Australia 2WD Classic Rally Challenge #8 • Australia 4WD Classic Rally Challenge #8
17. 11. – 20. 11. 2016, Coffs Harbour • gravel 283.36 km • total distance including road sections - 1038.64 km • Other years
SS9 Newry16 2 - 10.49 km
- 18. 11. 15:02
| 1. |

#65 |
- McCarthy John Toyota Corolla TRD S2000 |
ASN | 7:10.9 | 87.6 | |
| 2. |
#76 |
- Preston Ryan Mitsubishi Lancer Evo IX |
ASN | 7:30.9 |
+20.0 + 20.0 |
83.8 1.91 |
| 3. |
#70 |
- Nicoli Daymon Subaru Impreza STi N12 |
ASN | 7:36.3 |
+25.4 + 5.4 |
82.8 2.42 |
| 4. |
#71 |
- Allen John Mitsubishi Lancer Evo IX |
ASN | 7:40.1 |
+29.2 + 3.8 |
82.1 2.78 |
| 5. |
#68 |
- Macneall Glenn Subaru Impreza WRX STi |
ASN | 7:41.0 |
+30.1 + 0.9 |
81.9 2.87 |
| 6. |
#72 |
- Newell Kaylie Citroën DS3 R3T |
ASN | 7:41.7 |
+30.8 + 0.7 |
81.8 2.94 |
| 7. |
#74 |
- Llewellyn Rhys Subaru Impreza WRX STi |
ASN | 7:51.2 |
+40.3 + 9.5 |
80.1 3.84 |
| 8. |
#79 |
- Gleeson Jim Subaru Impreza RS |
ASN | 8:07.7 |
+56.8 + 16.5 |
77.4 5.41 |
| 9. |
#77 |
- Stephens David Mitsubishi Lancer Evo IX |
ASN | 8:24.3 |
+1:13.4 + 16.6 |
74.9 7.00 |
| 10. |
#63 |
- Gelsomino R. Subaru Impreza STi N12 [SR] |
ASN |
14:10.9 [N] |
+7:00.0 + 5:46.6 |
44.4 40.0 |
| = |
#64 |
- Calder David Mitsubishi Lancer Evo IX [SR] |
ASN |
14:10.9 [N] |
+7:00.0 + 0.0 |
44.4 40.0 |
| = |
#69 |
- Kelly Erin Toyota Corolla TRD S2000 [SR] |
ASN |
14:10.9 [N] |
+7:00.0 + 0.0 |
44.4 40.0 |
Overall
| 1. |
#65 |
- McCarthy John Toyota Corolla TRD S2000 |
ASN |
1:00:55.1 |
87.1 | |
|
2. +1
|
#70 |
- Nicoli Daymon Subaru Impreza STi N12 |
ASN |
1:03:04.5 |
+2:09.4 +2:09.4 | 84.1 1.46 |
|
3. +1
|
#68 |
- Macneall Glenn Subaru Impreza WRX STi |
ASN |
1:03:45.6 |
+2:50.5 +41.1 | 83.2 1.93 |
|
4. +1
|
#76 |
- Preston Ryan Mitsubishi Lancer Evo IX |
ASN |
1:03:50.1 |
+2:55.0 +4.5 | 83.1 1.98 |
|
5. +1
|
#72 |
- Newell Kaylie Citroën DS3 R3T |
ASN |
1:04:21.6 |
+3:26.5 +31.5 | 82.5 2.33 |
|
6. +1
|
#74 |
- Llewellyn Rhys Subaru Impreza WRX STi |
ASN |
1:05:10.1 0:10 |
+4:15.0 +48.5 | 81.6 2.88 |
|
7. +1
|
#79 |
- Gleeson Jim Subaru Impreza RS |
ASN |
1:08:21.7 0:10 |
+7:26.6 +3:11.6 | 77.8 5.05 |
|
8. −6
|
#69 |
- Kelly Erin Toyota Corolla TRD S2000 [SR] |
ASN |
1:08:44.4 |
+7:49.3 +22.7 | 77.2 5.31 |
|
9. +1
|
#77 |
- Stephens David Mitsubishi Lancer Evo IX |
ASN |
1:11:35.3 3:00 |
+10:40.2 +2:50.9 | 77.4 7.24 |
|
10. +1
|
#71 |
- Allen John Mitsubishi Lancer Evo IX |
ASN |
1:14:49.9 0:30 |
+13:54.8 +3:14.6 | 71.4 9.44 |
|
11. −2
|
#63 |
- Gelsomino R. Subaru Impreza STi N12 [SR] |
ASN |
1:15:01.0 |
+14:05.9 +11.1 | 70.7 9.56 |
| 12. |
#64 |
- Calder David Mitsubishi Lancer Evo IX [SR] |
ASN |
1:44:15.1 1:10 |
+43:20.0 +29:14.1 | 51.5 29.4 |
Penalty
| #79 |
|
Beard Mark - Gleeson Jim |
| Subaru Impreza RS |
0:10 - Late (1 min) at TC |
| #92 |
|
Cullen Bethany - McMinn Mel |
| Mitsubishi Lancer Evo 6.5 |
0:10 - Late (1 min) at TC |
| #97 |
|
Collits Lindsay - Dawson Brad |
| Holden Commodore |
0:20 - Late (2 min) at TC |
Info

"Much better than the first pass. Not a bad rhythm. We struggled between the stages though - our [wheel] nut gun didn't work, so it hasn't been easy to swap our tyres around."
"No grip at all. We lost time but I'm surprised by how much seeing as this is the second pass."

"No drama at all. There will be a good fight tomorrow. The stages will suit me better and we'll be in a good position. I'm feeling very comfortable."
"Everything is fine but it's easy to make a mistake in such changeable grip."

"I tried to do my best. And to be in my current position feels quite good. For sure my car is not working as well as Seb's here."
"I pushed as hard as I could all day. I have nothing to lose, let's see what we can do."
Ogier SS20
Mikkelsen after SS21

Camilli
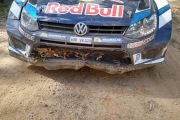
Paddon puncture SS20
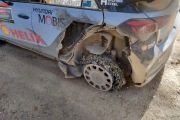
Latvala tyre SS15

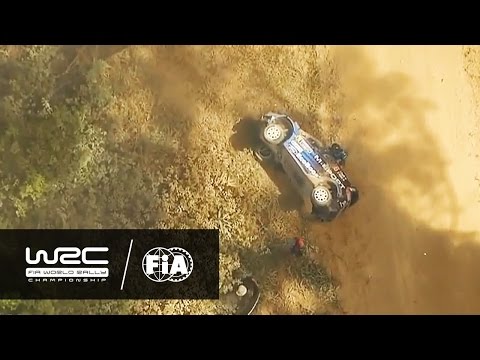
Rally Australia 2016 - Best of
Woifeh]
Woifeh]

Highlights - 2016 WRC Rally Austral…
Michelin Motorsport]
Michelin Motorsport]
WRC - Kennards Hire Rally Australia…
FIA World Rally Championship]
FIA World Rally Championship]

WRC - Kennards Hire Rally Australia…
FIA World Rally Championship]
FIA World Rally Championship]

Shakedown - 2016 Rally Australia - …
Michelin Motorsport]
Michelin Motorsport]